Manual Setup
Manual setup consists of two steps:
Preparing your system
Installing Dashticz
System preparation
Since Beta 2.4.6 (October 2018) the installation instruction changed. Main reason is that for most functionality PHP support in the web server is needed. The Domoticz web server doesn’t support PHP. That means that Dashticz needs to be installed under a different web server with PHP enabled. The installation instruction consists in two steps:
Installation of a web server
This example shows installation of Apache on Raspberry in it’s most basic configuration: running at port 80. Besides Apache also PHP needs to be installed, since it’s used by the Calendar and Garbage module in Dashticz.
sudo apt-get update
sudo apt-get install apache2 php php-xml php-curl libapache2-mod-php php-mbstring
sudo systemctl restart apache2
Note
On some Raspberry configurations the installation of php is failing. In that case you can try the alternative installs under Advanced Installation below
Now check whether Apache is running by browsing to http://<YOUR IP>
You should see the Apache demo page.
Alternative installations
For debian/stretch:
https://tecadmin.net/install-php-debian-9-stretch/ (PHP installation instructions)].
Functionality that is lost without PHP:
calendar
garbage
savings settings from Dashticz
version check
CORS proxy, which is used for TVguide, news, traffic info, frames, images in buttons (You can switch an external CORS proxy as well.)
Quick install for Synology NAS
Install Apache HTTP Server (Web Station will be installed too) and PHP
In Web Station configure your HTTP back-end server and PHP (PHP Extensions
curlandopensslneeds to be selected)Download Dashticz ZIP file from GitHub https://github.com/Dashticz/dashticz (choose branch)
Create Dashticz folder on your Web Server
Unpack downloaded Dashticz ZIP file to your Dashticz folder
Copy CONFIG_DEFAULT.js to CONFIG.js
Edit CONFIG.js to your needs and set write permission
Dashticz installed on ISS
You have to register a MIME type for tpl extension
mime-type type="text/x-phpbb-templateSee also https://bobcares.com/blog/http-error-404-3-not-found/ and https://forums.iis.net/t/1095097.aspx
Dashticz Installation
Example for Raspberry PI running Apache web server: Assumption:
Apache is running at
http://192.168.1.3on the default port 80 (but this can be any IP:port address)Domoticz is running at
http://192.168.1.3:8084
First clone the dashticz repository to a folder of your choice:
cd /home/pi
git clone https://github.com/Dashticz/dashticz
If you prefer the development branch (might be less stable, but latest and greatest), then use the following git clone command:
git clone https://github.com/Dashticz/dashticz --branch beta
After the installation is finished, go to the /home/pi/Dashticz/custom/ folder, copy the CONFIG_DEFAULT.js file to CONFIG.js (mind the CAPITALS!), and edit it with the basics:
cd dashticz/custom/
cp CONFIG_DEFAULT.js CONFIG.js
nano CONFIG.js
Example of CONFIG.js:
var config = {}
config['language'] = 'nl_NL'; //or: en_US, de_DE, fr_FR, hu_HU, it_IT, pt_PT, sv_SV
config['domoticz_ip'] = 'http://192.168.1.3:8084';
config['domoticz_refresh'] = '5';
config['dashticz_refresh'] = '60';
You can read more about the connection configurtion Connection.
Then create a symbolic link from the root of the www folder of your web server to the previously created Dashticz location:
sudo ln -s /home/pi/dashticz/ /var/www/html
Set the correct permissions to the files and folders:
chmod -R a+rX /home/pi/dashticz
If you want to be able to save the settings via Dashticz to CONFIG.js then you have to give write permission to CONFIG.js for root:
chmod a+w /home/pi/dashticz/custom/CONFIG.js
Now you can browse to the dashboard: http://192.168.1.3/dashticz/index.html Replace 192.168.1.3 with the IP Address (and Port number) for your web server, NOT your Domoticz IP!
By default, Dashticz will show all your Domoticz favorites on the dashboard.
Updating
Option 1 - From terminal you can add the following command in Dashticz folder:
git pull
Option 2 - Download zip file from GitHub, copy and extract in your Dashticz folder. Create backup of your custom folder(s) first.
Troubleshooting
After updating my Ubuntu version I had to manually enable php7.3 on Apache:
sudo a2enmod php7.3
sudo systemctl restart apache2
Domoticz authorization error
You have to do all the following things:
In CONFIG.js add the Domoticz username and password, like
config['user_name'] = 'admin';
config['pass_word'] = 'domoticz';
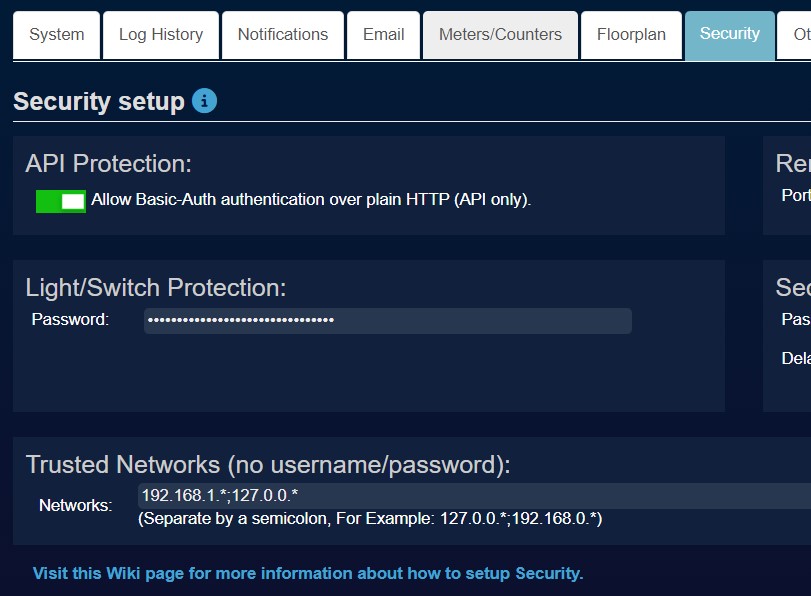
In Domoticz->Settings->Security tab:
Tick ‘Allow Basic-Auth authentication over plain HTTP’ in Domoticz->Settings->Security->API protection
Fill in your local subnet in Trusted Networks
Example of Domoticz settings: